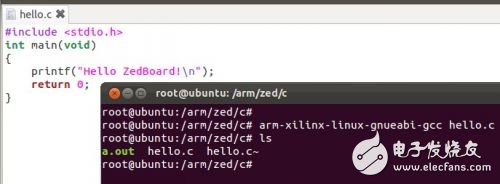
The most important thing to develop ZedBoard is the Xilinx ISE toolset, where most of the logic and underlying software development work can be done. If you do streaking development, an IDE is enough, but if you don't want to wear clothes for a lifetime, you need to involve software design under Linux, you have to compile in Linux. Xilinx's IDE seems to integrate the environment for developing Linux software, but rabbits are not very useful, and there are too many things that need to be compiled under Linux. In many places, SDKs can't do anything, so they still take the traditional route - in Linux. Create a Xilinx build environment. First install a virtual machine on the machine, install ubnutu linux1 12.04 stl version on it, if you are a 64-bit machine, you need to install a 32-bit library file. The method is sudo apt-get install ia32-libs, if you have further instructions on the 64-bit system distribution, visit: The next step is to download the cross-compilation environment URL: https://code.google.com/p/zedboard-book -source/downloads/detail?name=xilinx-2011.09-50-arm-xilinx-linux-gnueabi.bin&can=2&q=Installing a cross-compilation environment: An article on the Mentor website says that a 32-bit version of xulrunner is also required. I have not installed it here, but it can also be used. If you are not comfortable, you can follow the steps here: https://sourcery.mentor.com/GNUToolchain/kbentry62 and enter it in the terminal: dpkg-reconfigure dash in the pop-up dialog box No, change dash to bash in order to successfully execute the Sourcery CodeBench installer. Download the good installation file: xilinx-2011.09-50-arm-xilinx-linux-gnueabi.bin, enter ./xilinx-2011.09-50-arm-xilinx-linux-gnueabi.bin in the file path to open the installer. Rabbit chooses the default path (Do not modify PATH), the installed executable file path is /root/CodeSourcery/Sourcery_CodeBench_Lite_for_Xilinx_GNU_Linux/bin/, and each time you compile the software, you need to add the path of the compilation environment to the PATH environment variable through the export command. After compiling some content, you will need to modify ARCH. The instructions are as follows: export ARCH=armexport CROSS_COMPILE=arm-xilinx-linux-gnueabi-export PATH=/root/CodeSourcery/Sourcery_CodeBench_Lite_for_Xilinx_GNU_Linux/bin/:$PATH if you don't want to Enter all the time, just open the bash.bashrc file through the gedit /etc/bash.bashrc command, add the above command inside, so the boot will be executed automatically, you can also run the source /etc/bash.bashrc command to make the settings take effect immediately. Through the echo $PATH command, you can see the path we just set. Let's try to compile something, first of all HelloWorld. Find a place to create a new hello.c file, edit it with gedit, the code is as follows: #includeint main(void){ printf("Hello ZedBoard!"); return 0;} Enter the following command in the directory where the C file is located: arm- Xilinx-linux-gnueabi-gcc hello.c generated a.out file on the rabbit computer, probably the reason for the previous settings, not sure what to call you. Figure:

The self photographing lever is a popular self photographing artifact in the world. It can be extended and retracted arbitrarily between 20 cm and 120 cm. Users only need to fix the mobile phone or fool's camera on the telescopic lever, and multi angle self photographing can be realized through the remote control.
The technical design of the self timer lever is not complex. It is mainly composed of the self timer lever, fixed bracket, Bluetooth remote control self timer or bottom button. The fixed bracket can hold mobile phones, cameras and even tablet computers. The freely adjustable telescopic lever brings a wider shooting angle, and the operation can be controlled through the Bluetooth button at the bottom of the lever.
Selfie Stick,Mobile Selfie Stick,Bluetooth Selfie Stick,Flexible Selfie Stick
shaoxing shangyu Tianya Photographic Equipment Factory , https://www.tianyafoto.com
![<?echo $_SERVER['SERVER_NAME'];?>](/template/twentyseventeen/skin/images/header.jpg)