![<?echo $_SERVER['SERVER_NAME'];?>](/template/twentyseventeen/skin/images/header.jpg)
Xiao Biao Note: # Tan singles struck in the second quarter! Recalling 2017, the good goods bought at the end of the year come out, iPad, QC30, Kindle, Jingdong Card, etc. You will win. # Value Friends home # inventory 40 friends classic decoration case, share your decoration blood tears win EraClean million new fan. # The original innovator # contribution to enjoy an additional 300 gold, light sun single-meitu article 6 gold coins, waiting for you!
DigressionWhat could be worth buying in the second session of the Friends of the Friendship Day in May 2017? For the first time, I saw OSMO, the chief living person in air04, and was deeply poisoned. (In fact, he had several poisons in his trip to the Imperial Capital: Sony black card, macro lens, full-frame SLR, amount to harm me so far to eat soil). Today, OSMO Mobile, the entry-level handheld stabilizer that has been poisoning for half a year, has finally started. If there are really no year-end bonuses this year, I'm afraid I'll have to cry in the toilet.
Currently this artifact is still in the double 12 promotion period. Jingdong 1399, also divided into 6 interest-free, but also stacked coupons, but also to pick up a bicycle.
This want to follow the international practice to wave a single, out of the box to assess what. However, in this artifact that debuted in the past 16 years, there were not a few gods who wrote reviews. Contemplating the idea, it would be better if we couldn't revisit the product and provide another way to make a difference from another perspective. Think twice, the people who enter OSMO basically are to improve the stability of the picture when shooting video. If a worker wants to do good, he must first sharpen his tools. With this device, can things be accomplished? Another key is the video clip processing, so this article focuses on video editing. Now that the video is so hot, the threshold for shooting is so low. If you can easily get one from the idea to the shooting and then to the end, watching all the front and back behind-the-scenes work in the video subtitles is a name for yourself. Do you think? His own special calf. As the saying goes, technology is not more than a body, now get more than a skill, even looking for a job can be more than the odds.
Well, let's go directly to the topic. Based on practical principles, we will teach you how to use professional Premiere video editing tools quickly. If you are interested in this area, please pay attention to Pirates 95270, and look forward to working with you to conduct in-depth exchanges and discussions and progress together.
Let's share a video that we did before. Every time we buy a favorite Dongdong, we eat the desserts of the United States and the United States. The plain life can also be so joyful.
-------------------------- I am a decent tutorial split line ------------------ ---------

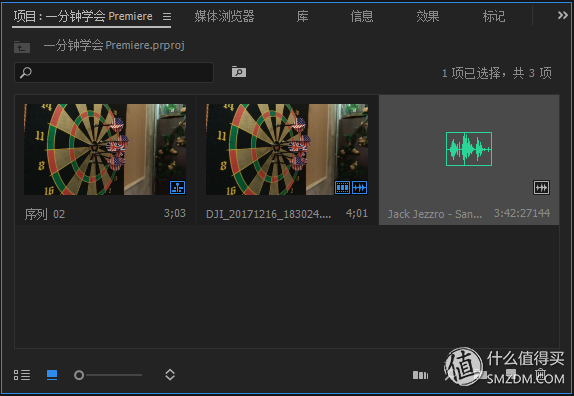
1, download the software
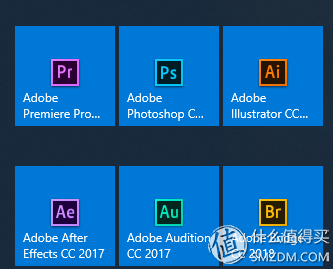
â–¼ As shown in the figure below, the first column of the first row is the Premiere (Pr) deity. He is a member of the famous Amutiao company family barrel. Specifically for video clips.
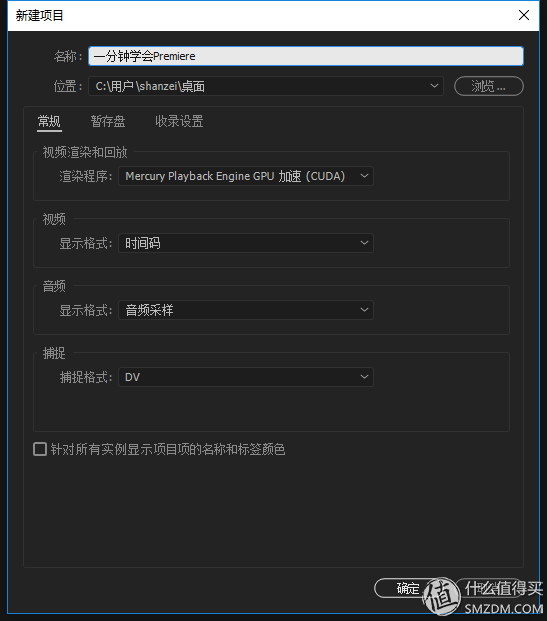
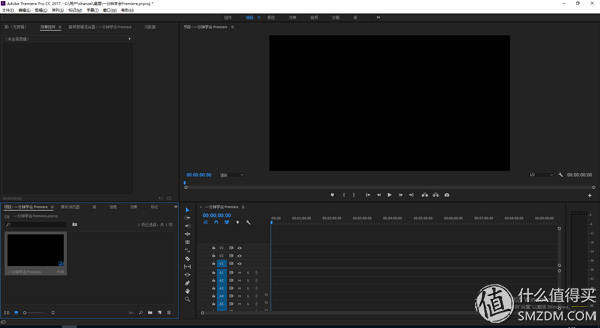
â–¼After opening the software, there will be a shell by default and nothing will be ignored. Click the "New Project" button.

â–¼After the new window pops up, the "Name" section will fill in the name of the original file you want to name. The "Location" section needs to select the location where the source file is saved. The others are left untouched by default. Click the OK button.
â–¼ After entering the software editing interface. As you can see in the figure below, this default interface has four parts.
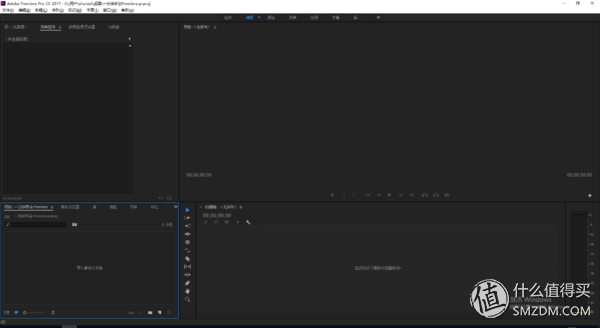
â–¼ Continue to see the figure below. The approximate functions of these four parts are: the upper left volume/action editing area, the upper right video main preview area, the lower left material area, and the lower right actual editing area. What are the specific gestures for these four parts? Do not control, follow my rhythm continue to go down.
3, the new sequence
â–¼ To see this step Many people have a question: the above editing interface from the default to the material screen, this is how to operate it? This step is to create a new sequence. In the lower left portion of the default interface, a menu appears when you right-click, select New Item > Sequence.
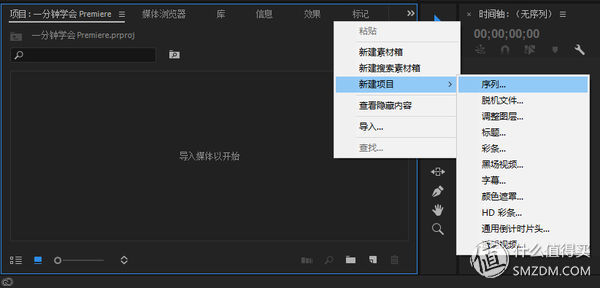
â–¼ The following new sequence interface appears. Follow the rhythm below. The sequence preset selects "AVCHD>1080P>1080P 25", then give the sequence a name and press OK.

â–¼ After that, the following interface will appear.
4, import the material
â–¼ Continue to right-click the area in the lower left corner, select the "Import" menu, and import the captured video file. The interface should look like this

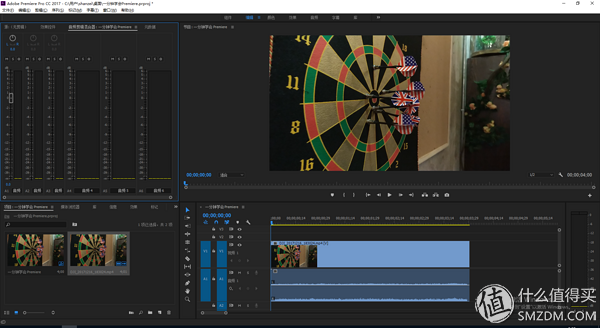
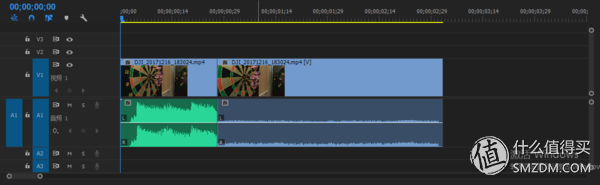
â–¼ Drag the material into the lower right area, adjust the position of the material on the timeline, and let go. If the screen size of the material does not match the current screen size, the following prompt appears. Select the left one. (If you want to continue using the existing screen size, select the right button. If you want to use the screen size of the current material as the size, select the left button. Since the materials shot are generally produced by the same machine, I will generally Select the left one.)

â–¼ Now that the material has entered the state to be edited, this time you are beginning to perform surgical operations on-demand.
Enter the key stage of video editing. When we cut out the video we shoot out, the most frequent operations are as follows. Let's elaborate on each one below.

After we finished a video, there are often many NG clips in the middle. These clips need to be deleted and filtered during editing. At this time, the video needs to be cut and reorganized. Proceed as follows:
The tool used is the "razor tool" (shortcut C) in the toolbar on the left side of the timeline, as shown below.
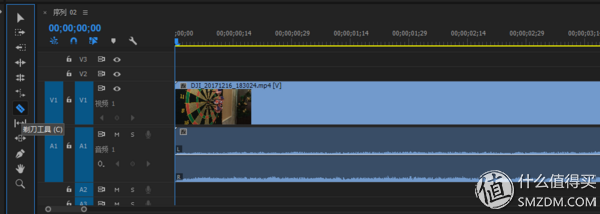
After selecting the tool, select the time point on the timeline of the video material to be cut. Click it to be a knife, and then click again to be a knife. The traces of cutting can be clearly seen on the interface.

I'm sure someone will ask, if my timeline doesn't have such a long area operation, how can I adjust the length of this operation area?
A: Move the cursor to the red box area below, hold down the "alt" button, and then scroll the mouse wheel up and down. You will find that the time axis area within the area will increase or decrease as the scroll wheel scrolls. To the length you can comfortably operate.
â–¼ Select "Tools" (shortcut V) in the toolbar, and then select the video to be deleted. The selected video will be highlighted at this time.
â–¼ Press the "del" key at this time to delete the video clip. There is a gap in the middle of the two videos. Continue to select the selection tool and click on the air raid area, then press the "del" key again to merge the two videos. Finally preview the finished video to see if it meets expectations.
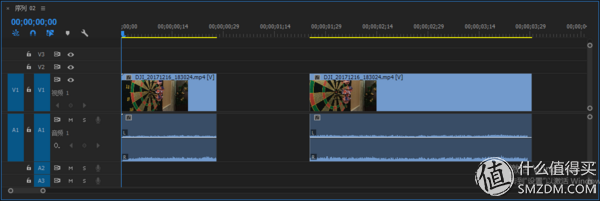
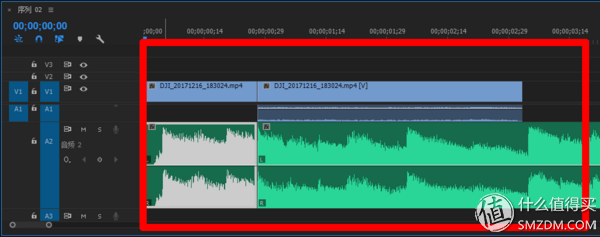
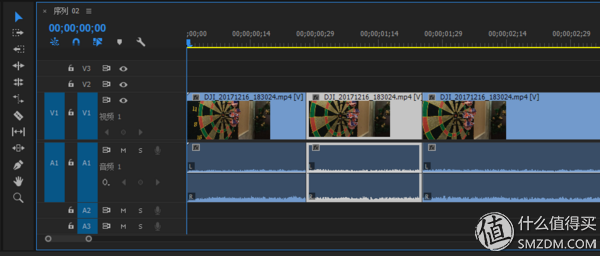
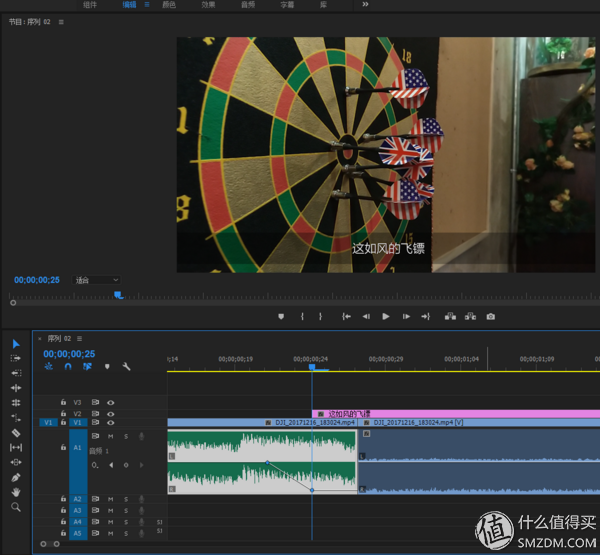
When video footage is dragged into the timeline, we see that the footage consists of two parts: the upper part is the animation, and the lower part is the sound. Animations and sounds are played at the same time during playback to compose videos of the video. Any one of the selected sounds or animations is also selected at the same time, and the deletion is also deleted. If we find that our own voice does not meet the requirements, we need to remove the sound part separately. You can do the following:
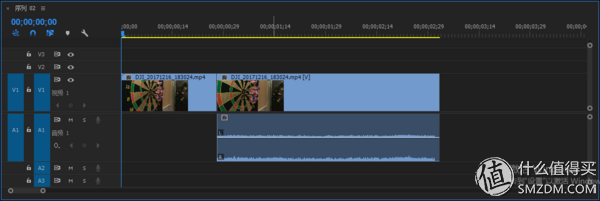
â–¼Select the part of the material that you want to delete the sound. Right-click and select "Unlink" from the menu that appears.
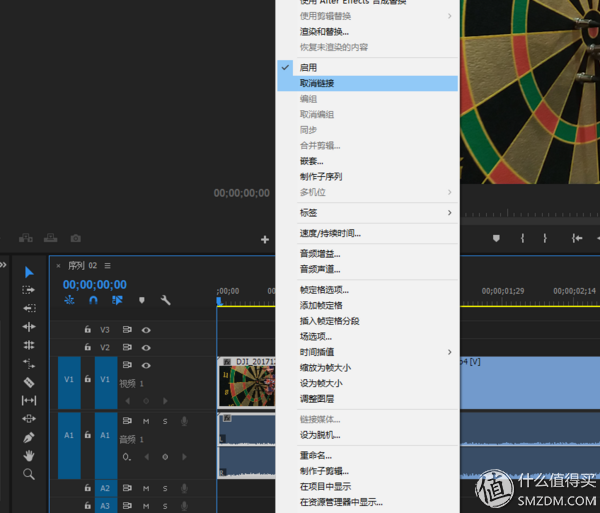
â–¼ At this time, click on the sound part of the clip and press the "del" key to delete the sound.
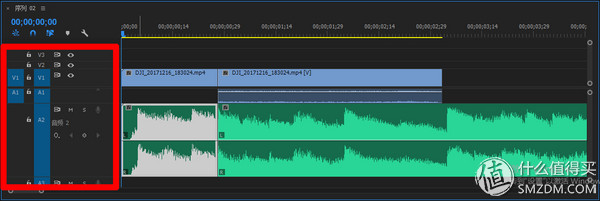
3, to the clipped video with new background music
It can often be seen that a fresh video, coupled with an elegant piece of background music, is highly effective. Here's how to do it. There are two steps. The first step is to delete the video soundtrack mentioned in the previous article. The second step is to add new background music to you.
â–¼ Select favorite new background music, download and import the material library (Import process can refer to the above operation introduction).
â–¼ Drag the sound clip to the timeline where you want to play the music. There is a caveat: if the material being dragged in is too long, it will cover other music (overlap) of the track, so if the material is too long, you can drag it to a single track and then cut the section as needed (procedure reference Crop video). And then dragged into the original track. When you play this part of the animation, the new sound will play synchronously.
Well, at this point I believe that you can also freely insert the music you want to match, but many people will have some doubts: the sound suddenly ends, I feel a sudden change in style, a bit unharmonious. If you can slowly lower it until it disappears, it's best. Okay, please continue to look down:
Careful classmates may find that their interface will have such a situation (the height is not as high as the figure above, and there is no clear track ripple on the figure above).
â–¼ How can I make height higher?
A: Move the cursor to the red area of ​​the lower icon, point the cursor at the line that needs to be high, and then scroll the mouse wheel. You can see that the height of the timeline can be adjusted freely.
â–¼ To what level of height is it considered to be the appropriate height? When the areas in the red box appear in the picture audio, it suffices.

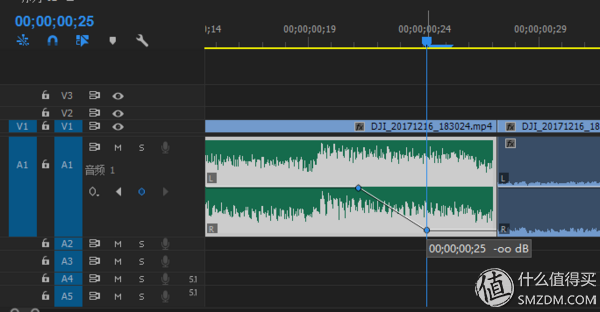
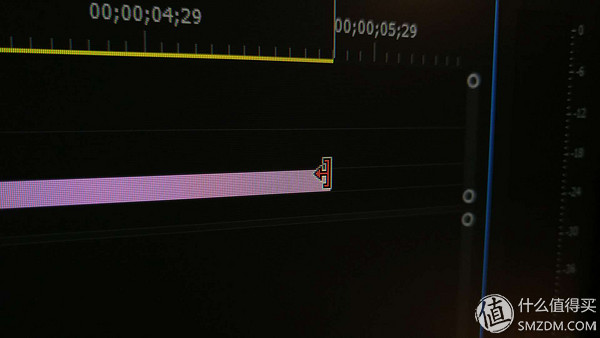
â–¼What's wrong with this stuff? Speaking for a long time, isn't it just to adjust the sound to begin to become lower in the designated place? OK, this step started to adjust. Select the audio section where you want to adjust the pitch. Careful students will find that a small dot in the red box is brightened.

â–¼ Move the timeline pointer to the starting point where you want to turn down the sound. Click on the lit dot. You will find two changes: the bright spot in the left red box turns blue, and the right audio timeline is also A small blue dot appeared synchronously.

â–¼ We continue to move the timeline pointer to the end position where we need to turn down the sound. Just like in the previous step, click on the left dot again and the second small blue dot will appear on the right side.

â–¼ The most critical step is coming. Click on the second little blue dot, drag it down and drag it to the parameter that shows the figure below. This means that the sound is infinitely low (that is, muted). This time you preview the timeline, and you will find that the sound in this area will gradually become lower.
The picture and sound are all settled. If this time can give some subtitle hints on the screen for the content of the picture, it is better to pull. For example:

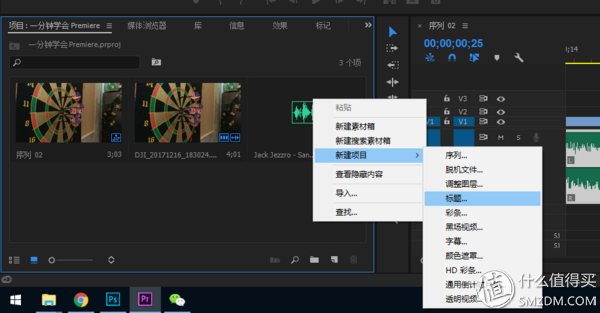
â–¼Choose the timeline position where you want to insert the subtitles. In the lower left area, right-click on "New Project > Title". Do not choose subtitles. Select the title.
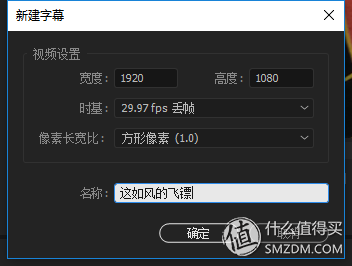
â–¼In the pop-up "New Marquee" box fill in the letter name, other default. determine.
â–¼ to enter the subtitle editing page, select the T button in the upper left corner, insert text in the screen, you can adjust the font, font size, color transparency, etc., as needed, after the adjustment is completed, drag the subtitles to the desired position. Fork off the upper right fork.

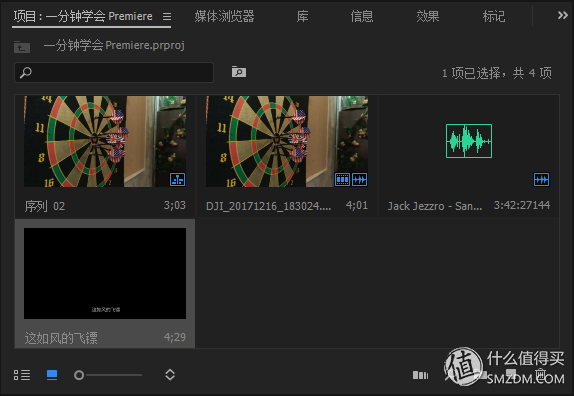
â–¼ This time, there will be one more subtitle material just created in the material list.
â–¼ Drag the clip to the specified position on the timeline. This subtitle will appear on the corresponding preview screen.
â–¼ At this time, you only need to adjust the length of time the subtitles appear on the timeline. How to adjust? Just move the cursor to the end of the subtitles. When the cursor appears below, click and drag to the end position. Finally preview the screen to see if it meets the requirements.
â–¼ Additional subtitles can also be scrolled, add actions, etc. These are left behind and then out of the tutorial, the above content enough for everyone to digest for a while.

Well, this article
A good video is actually a constant combination of some pictures, plus the sound of the appropriate embellishment. Let's share a video that we did before. Inspiring you, I believe creative people will shoot and edit better video works.
-------------------------- The following content is very important to me, thank you! ---------------------------
If you are interested in this area, please pay attention to the Pioneer 95270 and look forward to working with you to conduct in-depth exchanges and discussions, and progress together with everyone. If the number of fans can break 5000 on one day, I decided to share and share the “Stupid Tutorials and Knowledge of Still Life Shooting†that I always wanted to write but didn’t want to write. There's also about graphic design. Oh, I'm so YY....
Part1: About Photography


Part2: About graphic design


1200 puffs disposable vape pen are so convenient, portable, and small volume, you just need to take them
out of your pocket and take a puff, feel the cloud of smoke, and the fragrance of fruit surrounding you. It's so great.
We are China's leading manufacturer and supplier of disposable vape puff bars,1200 puff disposable vape, 1200 puffs vape kit,
disposable vape 1200 puffs,1200 puffs vape stick,1200 puffs vape pen, and e-cigarette kit, and we specialize in Disposable Vapes,
e-cigarette vape pens, e-cigarette kits, etc.
1200 puff disposable vape,1200 puffs vape kit,disposable vape 1200 puffs,1200 puffs vape stick,1200 puffs vape pen
Ningbo Autrends International Trade Co.,Ltd. , https://www.supermosvape.com