![<?echo $_SERVER['SERVER_NAME'];?>](/template/twentyseventeen/skin/images/header.jpg)
1. Alarm Control Data Query When configuring WinCC Alarm Logging, we can define different categories, types, user text blocks, etc. for alarm messages (Figure 1). With the above configuration, we can customize the filter conditions in the alarm. Query or display classified alarm information in the control.
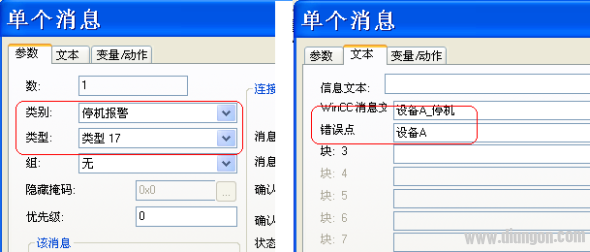
figure 1
1.1 Alarm Control Manual Query When configuring the alarm control, you can directly set the alarm control filter condition.
Double-click the alarm control, select "Message List" in the "WinCC Alarm Control Properties" dialog box, and then click the "Select" button in the "Data Preparation" area. In the "Specify Selection" dialog box, pass the list on the left side. The selection of the marquee can be combined with any filter condition (Figure 2).
The configuration of the "downtime fault" type alarm for the query error "Device A" is given in the legend. After saving the configuration, this alarm control directly displays the filtered query results at runtime.
Click the "Delete Selection" button to delete the configured filter conditions and then reset them.
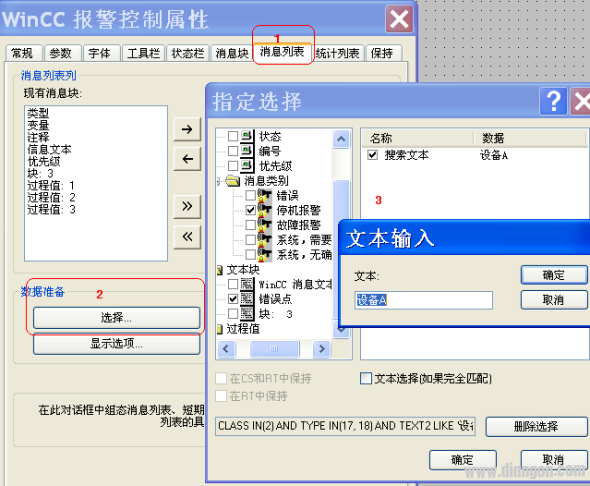
figure 2
The alarm control can also use the toolbar to set the filter conditions while the system is running.
Double-click the control when configuring the alarm control, select "Toolbar" in the "WinCC Alarm Control Properties" dialog box, and check the "Selection Dialog" (Figure 3) to save the settings.
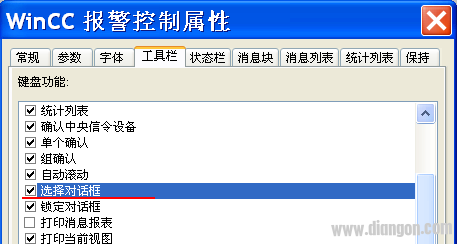
image 3
When the system is running, on the Alarm Control toolbar, click the "Open Selection Dialog" button. In the "Specify Selection" dialog box, you can also combine the filter conditions by selecting the check boxes in the left list (Figure 4).
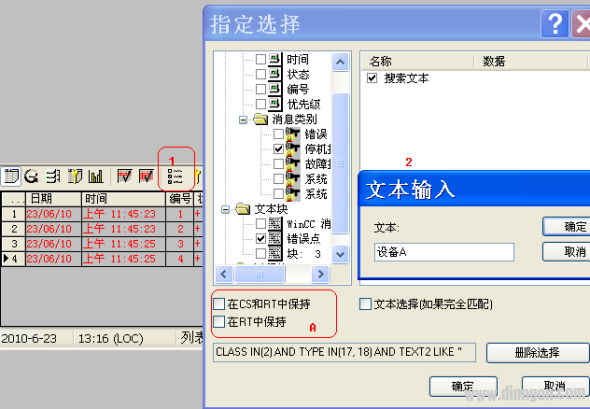
Figure 4
For the meaning of the parameter options in the area A in the figure, please refer to (Table 1).
Setting Meaning No setting The configuration will be lost the next time the screen is switched. "Keep in CS and RT" Even if the system is shut down and restarted, the configuration is maintained. The configuration "Keep in RT" remains until the system is terminated.Table 1
1.2 Using the script to query the alarm control In the VBS and C scripts provided by WinCC, you can set the corresponding SQL query statement to the "MsgFilterSQL" attribute of the alarm control to set the message filtering.
There is an easy way to get a query SQL statement. Manually set the query condition in the control. In the output box to the left of the "Delete Selection" button (Figure 4), this is the SQL statement for this query condition. You can copy this statement directly into the script for use.
Figure 5 and Figure 6 show the script routine "Control1" for the "downtime" type alarm message of the error point "Device A": the object name "CLASS IN(2)" of the alarm control: "Shutdown" message Category number 2
"TEXT2 LILE 'Device A'": The text in the error point (text block number 2) matches 'Device A'
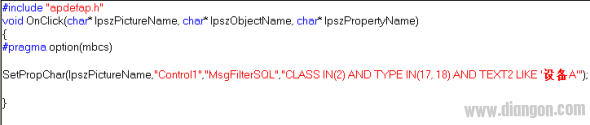
Figure 5 - C script

Figure 6 -- VBS script
For more detailed information on the use of the query SQL statement, refer to: WinCC Information System > Working with WinCC > Setting up a message system > Displaying messages in runtime > SQL statements for filtering messages of alarm controls
2. Online Trend/Table Control Data Query Online Trend/Table Control can be used to display archived data. Users can customize the start time/end time and do the archive data query within the time range.
2.1 Online Trend / Table Control Manual Query
1) Manual control of the trend control Double-click the online trend control in the configuration screen, select "Toolbar" in the "Properties of WinCC Online Trend Control" dialog box, check the "Select time range", save the settings (Figure 7) .
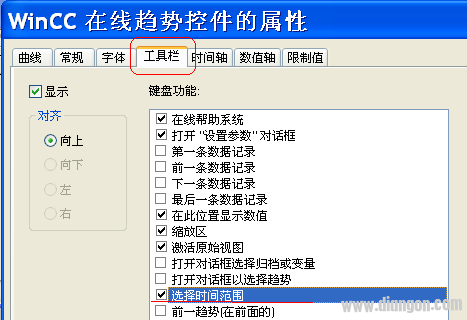
Figure 7
After the system is running, click the “Start/Stop†button on the trend control toolbar to stop the data update. Then click the "Select Time Range" button, first cancel the "Time Range" check box in the pop-up dialog box, then fill in the start time / end time (Figure 8), and finally click OK.
2) Manually query the online form control Double-click the online form control in the configuration screen, select "Toolbar" in the "Properties of WinCC Online Form Control" dialog box, check the "Select time range" and save the settings (Figure 9 ).
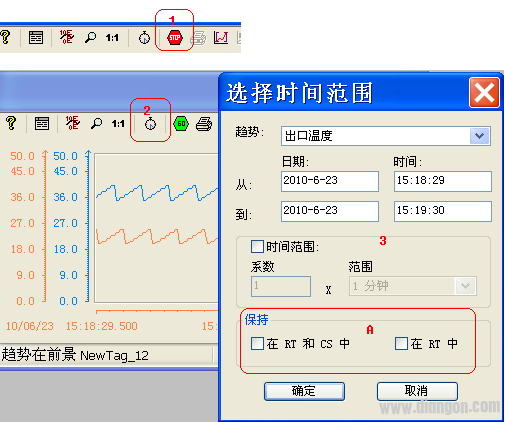
Figure 8
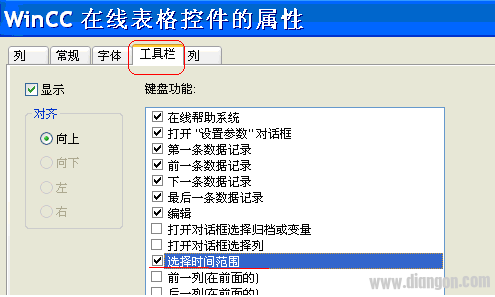
Figure 9
After the system is running, click the "Start/Stop" button on the table control toolbar to stop the data update. Then click the "Select Time Range" button, first cancel the "Time Range" check box in the pop-up dialog box, then fill in the start time / end time (Figure 10), and finally click OK.
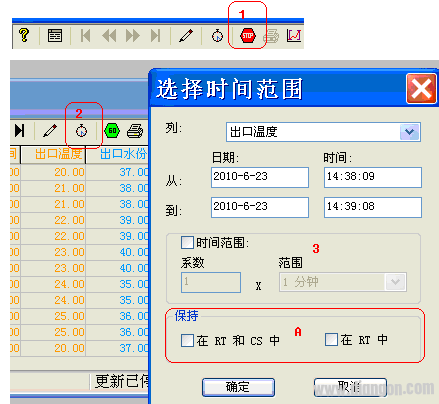
Figure 10
Refer to Table 1 in Chapter 1 for the meaning of the parameter options in Area A in Figure 9 and Figure 10.
2.2 Using the script to query the online trend/form control In the VBS and C scripts provided by WinCC, you can use the C script internal function "SetPropXXX()" or the VBS script to use the properties of the control object to do the archiving data. Range query.
Figure 11 and Figure 12 show the C and VBS script legends used for the archive data time range query (the following script trend/form controls can be used)
"Control1": Object name "Index" of the alarm control: Select the archive timeline in the control, in this case we use the common time axis, so the time range of the first archive will be used. The archive count starts from "0".
"Online": Switch the control to offline mode "TimeRange": Forbidden time range "BeginTime": Start time "EndTime": End time
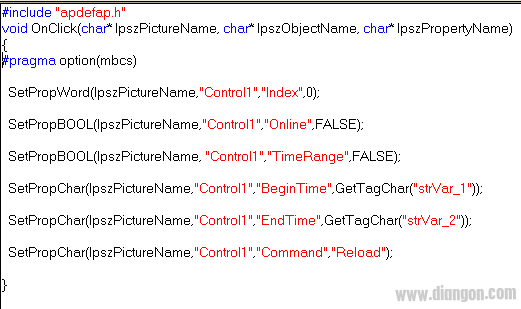
Figure 11 – C script
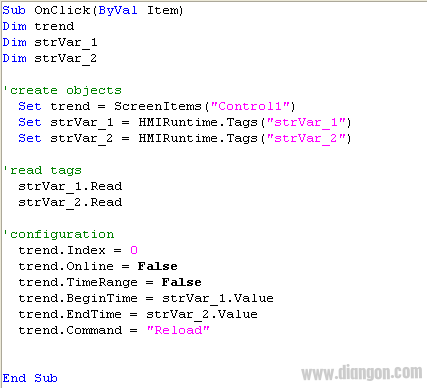
Figure 12 – VBS Script
In this case, the start time/end time is the use of 2 text variables for assignment. Special attention should be paid to the format of the date and time. This time format is not based on the time format displayed on the control, but on the time format of the operating system on which the project is running.
To view the time format method, open the "Control Panel" of the operating system, click "Regional and Language Options", click the "Customize" button in the "Regional Options", and view the "Time Format" in the "Custom Area Options". (Figure 13) and "Date Format" (Figure 14). The start/end time of the assignment must be spelled in this format. Please note the case of hourly H/h (24-hour clock) and the choice of separator.
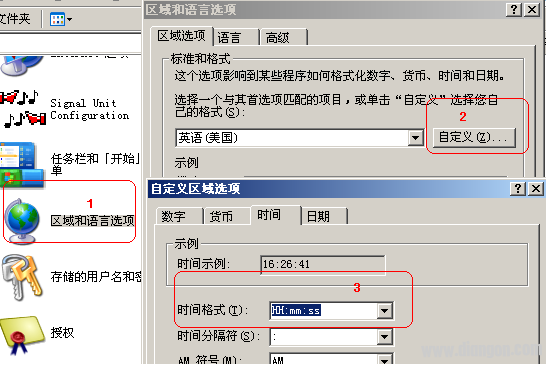
Figure 13
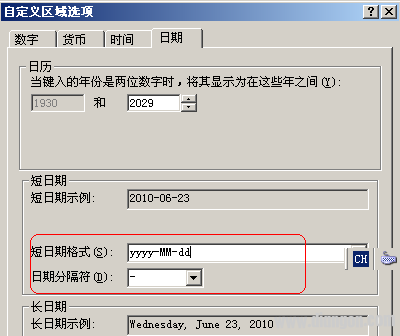
Figure 14
Sky Curtain,Led Grille Screen,High Resolution Display Screen,Led Grille Screen
Kindwin Technology (H.K.) Limited , https://www.szktlled.com